Thursday 7 August 2014

How To Get Back Instagram Photos on Twitter

No comments:
Instagram will not be displayed on Twitter anymore!! I don’t know the real reason, and honestly I don’t care even though there is a “cold war” between the social networks that mostly hurts the user. The only thing that I want to know is How to see Instagram Photos on Twitter feed. So how can I do that? Is that possible? Fortunately YES, a good guy named Michael Schonfeld had found an excellent solution about this issue. He created Chrome extension called InstaTwit.
Thanks to him all chrome user will be able to get Instagram photos back in their Twitter feed. Install InstaTwit, open your Twitter account and click refresh. After this the Intstagram photos will appear on your Twitter account, just like it was before.

Note: Unfortunately this extension works only with Google Chrome, I hope soon we will be able to use this extension with other browser such as Firefox, Safari, etc. Until then we must use Chrome to see Instagram Photos  inside Twitter.

Google Plus Theme for Windows 7

No comments:
Google+ is is growing so fast and will grow faster in the the days to come. It is a social network created by Google which has a lot of new features that were never seen in other social networks.Yesterday while searching for some Google Plus inspired wallpapers accidentally I found this great Google Plus theme for Windows 7. It is designed by a guy from NicheWP. This theme is designed using 6 different Google Plus wallpapers which will change after every 5 minutes.
Google-Plus-Windows-7-theme 

How to Change Your Start Button in Windows 7

No comments:
Every version of Microsoft Windows has always been an interesting environment where every computer geek can modify and add something personal to it. When I say modify and add I mean customizing the Windows look like: taskbar, icons, desktop, themes etc. But in general you don’t need to be an avid Windows user to achieve results in customizing because today there are a lots of small programs that are created to perform a specific customization.
In this post I would like to show you an interesting tool that will allow you to change the Start button in your Windows 7 or the Start Orb how most of people call it . It’s Windows Start Button Changer, created by Kishan Bagaria from Door2Windows.

First you need to download the Window Start Button Changer by clicking here. After downloading it, open the zip file and unzip it. Find the .exe file and run it.
This tool is very simple, so changing the Start Orb with it is more than easy. Just Click the Orb and locate the desired button and it will be changed within a second. In the .zip file you can find a folder with 10 sample orbs and you can choose one of them. But if you don’t like them, then search on Google for sample Windows 7 Start Orbs and you will a huge collections.
If you don’t like the button you have added then you can add another one or restore the original one.
Good luck!

How to Reset (Restore Factory Settings) Blackberry Curve

No comments:
If you are experiencing different problems with your Blackberry Curve then the best solution is to reset or restore the factory settings. In this article I’m going to show you step by step how to reset your Blackberry Curve and bring back the factory settings. But before we continue you should know that you have to backup all your data stored in your Blackberry (messages, emails, contacts, files, documents etc) using your Blackberry Desktop Manager.
To restore the factory settings of your Blackberry Curve follow these steps:
Step 1: Press the Blackberry key, scroll down and go to Options.
Step 2:  In the Options section by scrolling down continue to Security Options.
Step 3:  In the Security Options section continue to Security Wipe. This option will wipe out your Blackberry Curve and will bring it in a factory state.
Step 4:  Now you are at the Security Wipe section. This option will wipe out your Blackberry Curve and will bring it in a factory state. There is also option to select which data you want to wipe from your Blackberry. If you select Emails, Contacts you have to know that you will not be able to send or receive emails in your Blackberry Curve, so you will have to configure it again. There is also option to delete all the installed application and also an option to delete any single file from your Media Card. So it’s you choice what you want to keep and what you want to wipe.
Step 5: Before you continue with the resetting process, you will have to enter the word ‘blackberry’ in the given text box and click the Wipe button.

The restore process will start immediately. After it is completed a restart is required for changes to take effect, so click the Restart Now button.

Your Blackberry Curve will be restarted and all the changes will be applied.


Now your Blackberry Curve is already reset. The factory settings are applied. Hope you didn’t experience any problem while performing this process.
If you have any question regarding this topic or you think I have missed something feel free to use the comment form below and let me know about it. Good luck!

direct link to download whatsapp on PC

No comments:


Click here to download it direct to your PC... just wait for the page to load and twill be downloaded directly to your PC

Monday 4 August 2014

how to use facebook without internet

No comments:
I know Title Of  Post Sounds somewhat funny but friends You can use facebook with no internet connection And Even On Phones Which don't Have Internet Support.
And the best thing is that its Completly free.Facebook India has partnered with Fonetwish to bring Facebook on every mobile phone without requiring any apps or even the Internet.Now you can able to use facebook on cell phones like 1100.which don't have any browser or internet facility.


http://techwarlock.blogspot.in/2012/03/use-facebook-without-internet.html


The only You have to do is to  dial *325# 
from your mobile phone and follow the instructions.

First of all it asks for Facebook username and password,You have to enter these information via a number based command Prompt.
After You get in.You will see a menu like 
  1. news feed
  2. update status
  3. post on wall.
  4. friend request.
  5. messages.
  6. notifications.
    *Account settings.


    You have to enter desired Number in a number based command prompt for accessing your account.

how to a million friends on facebook

No comments:
STEP 1: Go To  http://rankbook.co/facefriendrequester.php  And Click On TRY NOW to download the One Day Trial Pack Of Facebook Auto Friend Adder Pro 3.1 .

STEP 2:Its A Small Software, After Download Install That..

NOTE: During Installation It needs Microsoft .Net Installer Framework 4..If You don't Have this Framework on your computer Then Download and Install This By Going Through This link

Click Here To Download .net installer


After that Click On "Start Download" To Download And Install Microsoft .Net Installer Framework 4.


STEP 3: Double Click To Open Facebook Friend Requester. You will Look Something Like This.

In Url Bar of Facebook Friend Requester Type "http://www.facebook.com/"
and then
Enter Your Facebook Username and Password And Login From That Software.

http://techwarlock.blogspot.in/2012/06/how-to-get-1000000-of-friends-on.html


STEP 4: After Login Go To Any of Your Friends Profile Or any Famous Facebook Fan Page Or Group Where You Want To Add All Members In Your Friend List.

STEP 5: After That Click On "Get user Id From Page" Which you Can See In The Left Hand Side Of the Page.It Will Take Sometime to Gather User ID of Everyone Present On The Page,Friend list Or In a Group.

http://techwarlock.blogspot.in/2012/06/how-to-get-1000000-of-friends-on.html


STEP 6: If You want To Select A Time limit To Send Requests Duration from One Person To Another Then Click On "Settings Tab" Under The Software And Modify Value From 50 To Anything. :)


STEP 7: After That Come Back To "Get Users ID" Tab And Then Click On "Send Friend Requests"
It Will Send Friend Requests To All The People's Profiles Who's USER ID is Fetched By You..


You Can Try This On Biggest Groups Or Pages Where Number Of Members Is More Than 100000
Or Even You Can Apply This On Your Friends Profile..And You Can Able to Send Them a Request In A Single Click... :))
When People Starts To Accept Your Requests..You Will See A Massive Increase In Your Facebook Friend list..So Try This SimpleTrick To get friends on facebook And Please Comment.. :)
EnjOyy..!!

how to sense what you are typing with your phone sensor

No comments:
If you work a desk job, chances are you keep your smartphone handy on your desk while you're working. And why not? If you get a call, it's hard to pull your phone out of your pocket with your butt custom molded and sweat glued to your chair. The whole point of a mobile phone is convenience, so there's really no reason not to keep it right there by the keyboard.
That is, there wasn't until a cadre of supervillains (ahem, "researchers") from Georgia Tech decided to create a program that turns your innocent-looking smartphone into a nosy little asshole that sits there spying on your every keystroke. Passwords, email messages, IMVU sex chats -- your phone could be eavesdropping on all of it. You might suspect that some kind of camera or microphone hack is at play here, but the real modus operandi is even sneakier: As you clack away on the keyboard, your phone's accelerometer can pick up the tiny impacts resounding through your desk and, based on the distance of the keys from the phone, mathemagically deduce which keys you're stroking.
Comstock Images/Comstock/Getty Images
"P-O-R-N-H-U-B ..."
Phones with motion sensitivity on the level of an iPhone 4 can guess what you're typing with up to 80 percent accuracy. And this clever bit of spyware can easily Trojan horse its way onto your phone as part of an otherwise trustworthy-looking app, since it doesn't arouse your tinfoil-hat suspicions by asking for permission to use your camera or microphone. The humble tilt sensor is rarely protected against privacy intrusions, because who would ever have guessed that the little gizmo that flips your screen over when you turn your phone sideways could also be used as a goddamn drunken Facebook status update interceptor?
Of course, the algorithm for figuring out what you're typing based on tiny desk tremors is mind-bogglingly complicated, and the whole system is easily defeated by ... just not setting your phone next to your keyboard, so the chances of such an attack by your local garden-variety hacker are low. But since we already know that the government is trying to listen in on us at all times, we're typing up this article with a phone next to the keyboard just to let them know that we know.
Martin Poole/Stockbyte/Getty Images
It's called subtlety, guys.

Saturday 2 August 2014

Lock a Folder With Password Using Free Folder Protector

No comments:


All of us have some files and folders that we consider private. They can be anything from our business documents to pictures of friends and family. These are files that we don't want other people using our computer to know about. As Windows offers no way to protect our private information, most of us get in awkward situations when these files are discovered by unwanted people.

Lock Folder Windows
Surely, you can store this information in a hidden folder. The only problem is that anyone can easily search the contents of a hidden folder using Windows Search itself.

The only viable solution is storing this content in a password protected folder so that only those people knowing the password of the folder can access it. There are many folder locking programs available online but the problem is that most of the good ones are paid. Even if you do manage to get a good free one, you will be looked at suspiciously when people see a folder locker in the list of your installed programs.

If you too find yourself in a similar situation, you can try Folder Protector, a password protector for Windows folders that is not only free but is also portable meaning that it does not need to be installed. Just click on the exe file and the program will start running. I have created this program based on suggestions and feature requests that I have received by email over the last two years.

how to make your computer talk on windows 8

No comments:
You can make your computer talk in a number of ways, which can be a valuable facility for people who have difficulties with reading, for someone who can’t see very well or at all, and for those who need to give their eyes a rest. These guides explain how to use the in-built speech.
There are also third-party screen-readers and text-to-speech software applications available.
  • To open the Ease of Access Center press ‘Windows’ logo key +‘U’
  • On a touch-enabled device, swipe in from the right hand edge of the screen then tap ‘Search’ and enter Ease of Access in the search box.
  • Tap ‘Settings’ then tap ‘Ease of Access Center’ from the search results.
  • Using a mouse move the mouse pointer to the upper right hand corner of the screen, then move the pointer down to select ‘Search’ and enter Ease of Access in the search box.
  • Tap ‘Settings’ then tap ‘Ease of Access Center’ from the search results.
windows_8_Accessibility_settings
Fig 1
  • Click to start ‘Narrator’ under Quick access to common tools or press ‘Alt’ + ‘N’.

Fig 2
  • To start Narrator when starting Windows, click to select or ‘Tab’ to ‘Use a computer without a display’ under Explore all settings.
  • Click on or press ‘Alt’ + ‘U’ to ‘Turn on Narrator’ under Hear text read aloud.
  • Click on or press ‘Alt’ + ‘O’ to select OK.
  • Once you turn on Narrator you are able to select what Narrator will read aloud, Fig 3.

General Settings
Press Alt + G to select Narrators general settings.
  • Alt + M to select Start Narrator Minimized, if you want the settings box minimized at start up.
  • Alt + E to select Echo User’s Keystrokes, if you want text to be read aloud as you type.
  • Alt + R to select Read out voiced Narrator errors.
  • Alt + V to select Enable visual highlighting of Narrator cursor.
  • Alt + P to select Play audio cues.
  • Alt + H to select Read hints for common items.
  • Alt + A to select Lower the volume of other apps when Narrator is running.

Ease of Access page

You can find more settings on the Ease of Access page where you can assign ‘Windows’ key + ‘Volume Up’ quickly turn on ‘Narrator’.
  • On a touch-enabled device, swipe in from the right hand edge of the screen then tap ‘Search’ and enter Ease of Access in the search box.
  • Tap ‘Settings’ then tap ‘Ease of Access’ from the search results.
  • Using a mouse move the mouse pointer to the upper right hand corner of the screen, then move the pointer down to select ‘Search’ and enter Ease of Access in the search box.
  • Tap ‘Settings’ then tap ‘Ease of Access’
  • Tab to the drop down under ‘Pressing Windows + Volume Up will turn on’ and use the up and down arrow keys to select ‘Narrator’.

Narrator Settings

  • Tap three times with four fingers to review the full set of touch gestures supported by Narrator.
  • Drag a single finger around the screen to hear the name of the items you are touching.
  • Using a keyboard press Caps Lock + F1 to see the full set of Narrator commands.


Note: If this does not work it could be because your computer settings cannot be changed due to local IT policies – contact your local IT support for further help.

how to make your computer welcome you

No comments:
Image result for talking computer

Do you watch movies? Have you always loved the way how Computers in movies welcome their users by calling out their names? I bet that you too would want to know how you can achieve similar results on your PC and have a computer said welcome. 

Then you are at the right place, this article describes exactly how you can make your computer welcome you like this.

With this trick, you can make your Computer welcome you in its computerized voice. You can make your Windows based computer say "Welcome to your PC, Username."

Make Windows Greet you with a Custom Voice Message at Startup

To use this trick, follow the instructions given below:-

  1. Click on Start. Navigate to All Programs, Accessories and Notepad.
  2. Copy and paste the exact code given below.
Dim speaks, speech
speaks="Welcome to your PC, Username"
Set speech=CreateObject("sapi.spvoice")
speech.Speak speaks
     3.  Replace Username with your own name
     4.  Click on File Menu, Save As, select All Types in Save as Type option, and save the file as Welcome.vbs or "*.vbs".
     5.  Copy the saved file. 
     6.  Navigate to C:\Documents and Settings\All Users\Start Menu\Programs\Startup (in Windows XP) and to C:\Users\ {User-Name}\AppData\Roaming\Microsoft\Windows\Start Menu\Programs\Startup (in Windows 8, Windows 7 and Windows Vista) if C: is your System drive. AppData is a hidden folder. So, you will need to select showing hidden folders in Folder options to locate it.
     7.  Paste the file.


 Make your Computer Welcome you at startup

Now when the next time you start your computer, Windows will welcome you in its own computerized voice. 

Note: For best results, it is recommended to change sound scheme to No Sounds.
You can change the sound scheme to No Sounds by following the steps given below:-
  1. Go to Control Panel.
  2. Then click on Switch to Classic View.
  3. Then Click on Sounds and Audio Devices.
  4. Then Click on the Sounds Tab.
  5. Select No Sounds from the Sound Scheme option.
  6. If you wish to save your Previous Sound Scheme, you can save it by clicking Yes in the popup menu.
  7. Click on OK.
Change Sound Scheme to No Sounds

Try it yourself to see how it works. In my personal opinion, this is an excellent trick. Whenever I start my PC in front of anybody and the PC welcomes me, the fellow is left wondering how brilliant a computer do I have.

how to become a computer freAK

No comments:

1. Learn How to Use the Command Line

The truth is that using the command line is not as exciting or easy as it seems like in Hollywood movies. However, learning how to use the command line might prove to be extremely helpful. Power users adore using the command line, because they can perform complicated tasks by simply pressing a few keystrokes.
There are a wide variety of shortcuts, but it takes too much time to present them all here. However, if you want to learn more about using the command line like a pro, check the following link:Become a Command Line Ninja With These Time Saving Shortcuts

2. Find Additional Uses for Programs you Already Have

Computer nerds will always think out of the box, especially when it comes to finding new uses for the tools and programs they already use. Most programs can be used for more purposes, in addition to their original one. For instance, the file-syncing program, Dropbox, can be used to monitor your home computer, download torrents or even print files from afar. You can also use Gmail to find out if someone has stolen your phone.

3. Understand When Too Much is Too Much

When your computer starts to work a little too slow, you need to find out the real cause behind this problem. Usually, one app will slow your system down, so you need to find it and close it as fast as possible.
The following tools should help you find the real cause and terminate it: Rainmeter (for Windows) and MenuMeter (for Mac).

4. Know the OS’s Hidden Features

Every operating system (OS) has its own tricks and features hidden under the hood. System tweakers such as OnyX for Mac and Ultimate Windown Tweaker are simply great for finding secret features. If you are a Windows user, you can learn how to hide secret data inside a file, cascade specific windows or undo an accidental file move.
As a Mac user, discover how to create search tokens when searching for specific files, manage the privacy settings of an app or automatically restart your computer when it freezes.

5. Learn How to Crack Passwords

By learning how to break into a computer you will certainly increase your self-esteem. Everyone knows how to create secure passwords, but only a legit computer hacker knows to get the data they want. This is also a good exercise, because you will learn how to protect from cyber criminals in the future.
Some of the worlds most famous hackers have been hired for government operations and international projects to defend against other cyber attackers. We don’t condone hacking, it does help though to be one step ahead of a cyber bully heading your way though.
computer nerd

6. Use the Scheduling Tasks

Sometimes it is better to stop performing all that system maintenance all by yourself. The built in task scheduler allows you to run any task you need, whether it is defragmentation, picture upload, reminders or even alarms.

7. Use the Keyboard More

A true computer geek knows all the basic keyboard shortcuts, such as “ctrl-C or ctrl-V”. Learn the most common shortcuts for Word, Gmail, Photoshop and other programs you use on a regular basis. After only a few months, you will be able to blow through text boxes and menus at unbelievable speeds with precision.

8. Discover New Operating Systems

If you really want to impress your friends, you should try to learn more about Windows, Mac and Linux.
Each OS has its own pros and cons that can be noticed with ease, so learning more about each system should not be such a daunting task. The cool thing is that there is a lot of software out there nowadays where it allows you to install another operating system on your computer so you can switch between each Operating System when you please.

9. Protect Your Data

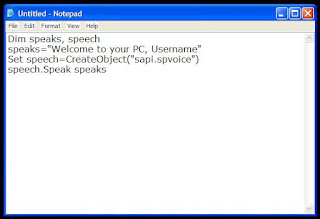
Hide your precious info into a text file and hide it in a secret location on your computer.
Don’t forget to “Empty” your Recycle Bin or Trash on your computer once you have sent unwanted files or data there, that way it makes sure that nothing can be retrieved by any surprise guests you may have access your computer.

10. Tweak Your Hardware

With a bit of professional tweaking, you can now push your computer past its original limits. Installing Mac on non-Macs and over clocking your processors are not so hard to accomplish.
There are instructions out there to find out the details of your computers hardware, google search how to find your computer models information, note down the RAM and go down the road to your local computer hard ware store and buy bigger RAM sticks eg… 8GB, 16GB, 32GB etc… (Just make sure that each stick is the same make and model if you can for the best performance.
Jump on YouTube and learn how to Install RAM in your particular type of computer, this will increase your computers memory allowing your computer to run more efficiently.


All these cool simple tricks and hacks that can be learned from computer nerds are extremely useful, but require a little time and patience in the beginning.

Enjoy them and become a true computer geek.


If you have come across any cool hacks or tricks on your computer that have turned out to be pretty useful please share them with us in the comment section below.

Friday 1 August 2014

How to root a nokia phone

No comments:
This is for the new nokia releases; nokia X and XL
This act of rooting nullifies your warranty
Nokia made its fans all nostalgic, when it announced the Nokia X,Nokia X+, and Nokia XL handsets at the MWC expo - a tribute to what could have been, if the company went with Android, instead of Windows Phone. Actually, it could have been even better, as those three are low-end, affordable devices, running a forked version of Android.

How to root the Nokia X, Nokia X+, and the Nokia XLThe interface overlay might be called Nokia X UI 1.0, but, 
since we have the open-source Android platform underneath,
 the phones can have different launchers installed, 
They can also be rooted, it turns out, which will
 open the floodgates of installing custom ROMs, 
and even a few Google apps are likely to sneak in,
 for a good measure. 

If you are interested in rooting your Nokia X model, it is really easy to do - just follow the four simple steps below, or watch the demonstration video. This procedure is likely to void the phones' warranty, so have this in mind when you fire up the root application on your historic first Nokia with Android.

1. Download the Framaroot.apk on your Nokia X, Nokia X+, or Nokia XL;
2. Use the built-in Astro file manager, and browse to the folder where you downloaded Framaroot.apk, then tap on its icon to install;
3. Upon installation, start Framaroot. There are two root exploits to choose from - "Aragorn" and “Gandalf” - tap on "Gandalf";
4. Now reboot your Nokia X, Nokia X+, or Nokia XL, and you should be rooted.